![Nimbello_Logo_CMYK_Horzontal_Color_TM.png]](https://www.nimbello.com/hs-fs/hubfs/Nimbello_Logo_CMYK_Horzontal_Color_TM.png?height=40&name=Nimbello_Logo_CMYK_Horzontal_Color_TM.png)

How to Create a Batch
- Select the Create Batch tab at the top of the page.
- Upload your documents into the upload area on the right. You can drag and drop files onto the box, or click browse to select them.
- Fill in the batch properties on the left (see the table below).
- Confirm your files appear in the file list at the bottom with a green check in the Progress column.
- Select Submit.
Once submitted, your batch enters the normal processing queue and will appear under Data Verification when it is ready.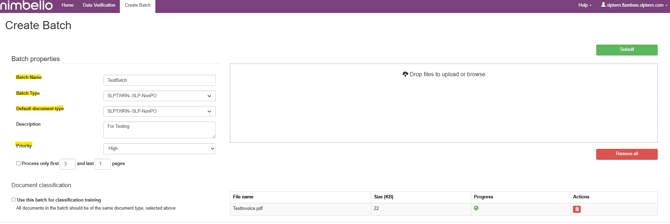
Complete the fields on the left side of the page before submitting.
| Field | Required | What to enter |
|---|---|---|
| Batch Name | Yes | A name that helps you identify the batch later, such as a date or reference. |
| Batch Type | Yes | The type that matches the documents you are uploading. |
| Default document type | Yes | Usually set this to match the Batch Type you selected above. |
| Description | No | Optional notes about the batch. You can leave this blank. |
| Priority | Yes | How soon the batch should be processed relative to others. |
| Process only first X and last X pages | No | Leave this unchecked in most cases. Only use it if you want the OCR to skip certain pages. See the note below. |
Processing Only Certain Pages
The Process only first X and last X pages option tells the OCR to read only the pages you specify and skip the rest. This is helpful when a document has extra pages that do not need to be captured.
Leave this option unchecked unless you have a specific reason to limit the pages. When unchecked, the OCR reads every page.
Important: Do Not Use Classification TrainingAt the bottom of the page you will see a Document classification section with the option Use this batch for classification training.
Leave this option turned off. Classification is handled by other tools, and selecting this option can move your documents out of the normal queue. If that happens, the documents will not be available for standard processing.
If you are unsure, the safe choice is always to leave this option unchecked.
The File ListAfter you upload documents, they appear in the file list at the bottom of the page.
| Column | What it shows |
|---|---|
| File name | The name of the uploaded document. |
| Size (KB) | The file size. |
| Progress | A green check confirms the file uploaded successfully. |
| Actions | The trash icon removes an individual file. |
To clear every file at once, select Remove all above the file list.
Quick Checklist Before Submitting
- Batch Name entered
- Batch Type selected
- Default document type set to match the Batch Type
- Priority chosen
- Files uploaded and showing a green check
- Classification training left turned off
Once these are in place, select Submit to send the batch for processing.